Showing posts with label Christmas. Show all posts

Thursday, October 22, 2020

Homespun Holiday Keepsake Ornaments Kit


 Hello! I am thrilled to be showcasing a beautiful new stitching kit by Lizzie Jones! 

Who doesn't enjoy the holiday season, homes dressed with twinkle lights and special baubles that we see but once a year? Our debut stitching kit features four ornament shaped dies and a wide array of embellishments to make creating those special, heirloom ornaments a joy. The possibilities with this kit are truly endless! From 100% wool felt to a carefully curated collection of beads and sequins, everything you need to make beautiful ornaments arrives right to your door in one convenient package. The hardest part is choosing your favorite Color Story! This kit even includes needles, ribbon for hanging, and a zippered project bag so you can keep your works-in-progress safe and tidy. You'll be amazed how easy it can be to create holiday magic for your own home or to give to those you love!

Homespun Holiday: Keepsake Ornaments Kit Contents
27-piece die set
zippered project bag
2 all-purpose Needles in a handy storage tube
printed inspiration guide for easy reference
5 yards of 1/8" silk ribbon
5 rolls of 5" x 36" felt
5 skeins of embroidery floss
5 colors of beads
5 colors of sequins (in two sizes)
compartmented bead storage container

*die cut machine and fiberfill stuffing not included in the kit*
*kit qualifies for free domestic shipping*

The kit goes live at 9am ET on Friday (10/16). 

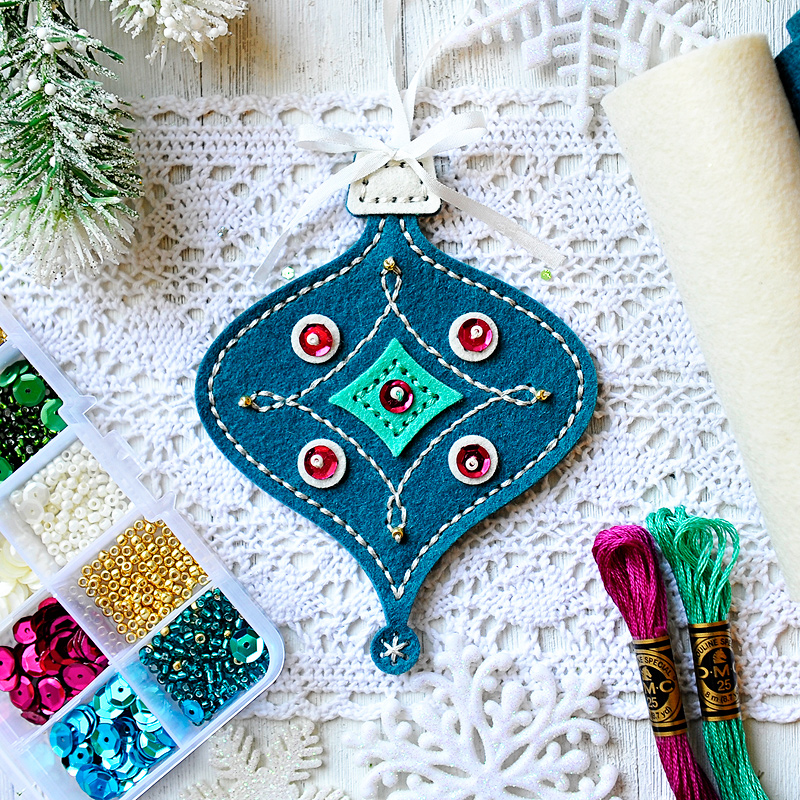
I had so much fun stitching these ornaments! Everything you need is included in the kit and there is enough felt, thread and beads to make a treeful of ornaments. I made 5 and you can't even tell anything is missing from my kit! 

Each kit comes with it's own color story, so you can pick out the color scheme that you like best. The one I'm working with here is called Elegance.


My first one here is using the purple, dark teal, light teal and cream colored felt. I also added sequins and beads for embellishments. I stitched all of my ornaments with three strands of the DMC floss. A lot of people use the 6 strands as they come, but I feel like my stitches look neater when I use only three.


 I just love this shape! This is one of my favorites! I used the light teal for the background on this one and added touches of the purple, dark teal and cream. I did not stuff my ornaments with any fiberfill. I like them better just flat. I considered adding a third layer of felt between them for thickness, but it really didn't need it. They are a nice thickness with just the two layers. 


 This might be my favorite one of all. I loved the cream colored background with the pretty stitched design in the center, embellished with some sequins and beads.  I added ribbon to the top of all of my ornaments and then glued a tiny bow at the top as well.


I think this is a very pretty shape too. I combined one of the just stitching dies along with some of the shapes, and added the beads and sequins. I can't wait to hang these on my tree and share a few with friends!

Here is a photo of all of the items that come with the Elegance Color Story kit. 


The kit retails for $150. The Color Stories will also be available separately and they will retail for $50. You can find out more details at Poshta Design.
The kit goes live at 9am ET on Friday (10/16). 

 Lizzie will be giving away a kit to one lucky winner! The winner will be drawn from comments on all of the participating designers blogs! So be sure to leave me a comment and comment on the other participating designer's blogs!

These are the other designers who have created some beautiful projects with this new kit!


I hope you have enjoyed my projects today! Enjoy the rest of your week and weekend!

Thanks so much for stopping by!

Hugs,

Kay :)


Saturday, November 23, 2019

Tis The Season


Hi there! I hope you are enjoying the holiday season! I have been making a lot of holiday cards behind the scenes here and thought I would share one of those with you today. I just purchased these two stamp sets and had so much fun working with them!


I used the Tis The Season Stamp set and Tis The Season Dies from My Favorite Things along with Stained  Glass Greetings  from Simon Says Stamp. The gingham was stamped with the Micro Gingham Background stamp from Ink Blot.


I used Distress inks for the blended background and sprinkled with water. All of the cute images were colored with Copic markers, cut out with the coordinating dies and added  to the card with foam tape. 


Both of the sentiments were stamp with Versamark ink and embossed with white embossing powder. The Merry was cut out with the coordinating die, and both were adhered with foam tape. 

All of the supplies I have used here are linked below. 

Thanks so much for stopping by!

Hugs,

Kay :)


Wednesday, December 13, 2017

Neat & Tangled: Warmest Wishes


Hello everyone! I hope you are enjoying the holiday season! I have another wintery Christmas card to share with you using some fun stamps and dies from Neat & Tangled. I mixed several different sets here to create this cute scene! I used Merry Kisses, Wild Ones, Lumberjack Love, Holiday Baking, and Into The Woods.


For the background, I used Smooth Bristol Board and blended some Evergreen Bough and Pine Needles Distress inks, then sprinkled with water and white acrylic paint.  I added a snowy hill at the bottom, and a sentiment from the Merry Kisses stamp set at the top.
All of the images were colored with Copic markers, cut out with the coordinating dies, and adhered with liquid glue. The two little animals in front, I adhered with foam tape for a little dimension.


I added lots of Stickles to the trees, candy cane, present and pudding, but it's hard to tell in the photo. In real life this card sparkles and shines!

I hope you have enjoyed my card today! Wishing you a wonderful Holiday season!

Kay :)


Monday, December 11, 2017

Newton's Nook: Snow Globe Scenes


Hi there! I am back again with some more fun projects I made with Newton's Nook Designs products! I had so much fun guesting with them last week, that I asked Jen if I could please do one more guest spot :) 

I love love snow globes, and have many stamp sets and dies for them, but I just couldn't pass up these! I used the Snow Globe Scenes Stamp set and the Snow Globe Shaker dies.


For my background I used Fired Brick Distress Ink on Smooth Bristol board and then sprinkled it with water. The images were all colored with Copic markers, and the Snow globe cut from color card stock.


I glued down the elements in the snow globe and then layered the outside piece on top. The Merry Sentiment, which comes with the Snow Globe Shaker dies, was cut three times and layered.

***


My second card was created exactly as the first, except that I used Cracked Pistachio and Peacock Feathers Distress Inks for the background, and created a little different scene inside.


There are so many cute elements in this stamp set, that you could create many different kinds of winter and Christmas scenes! 

All of the supplies I used are listed and linked below in the supply list.

Thanks so much for stopping by!

Hugs,

Kay :)


Saturday, December 9, 2017

Coffee Lovers Winter Bloghop

Hello! I thought I would have a little fun and join in the Winter Coffee Lover's Blog hop! It's been a while since I did a card challenge and blogged for fun, and I just happened to have the perfect stamp for this, so thought I would play!


Just in the past few months I have fallen in love with these adorable little Greeting Farm Girls! I had so much fun coloring her in Christmas colors to go with my little Christmas scene!

For the background, I stamped the snowflakes from the Snowflake Flurry stamp set in Unicorn White ink on Kraft card stock. I added a snowy hill and stamped the sentiment from the Polar Pals stamp set.


I colored cutie pie Latte Anya and all of the other images with Copic markers. The tree and presents are from the Christmas Dreams stamp set by Lawn Fawn. The tiny holly on her hat is from the Joy To The Woods stamp set by Lawn Fawn. Anya I fussy cut out, and the rest I used the coordinating dies to cut them out.

All of the products I used on this card are listed and linked below under supplies!

Thanks so much for stopping by!

Kay :)


Friday, December 9, 2016

Tim Holtz Snow Globe

Hello!

I have loved Snow Globes forever, and when I saw the new Snow Globe Die from Tim Holtz, I had to have it! There are 23 dies in the pack and they are so fun to mix and match to make fun scenes! You can put them in the snow globe or use the pieces to create winter scene cards, which are some of my favorites to make!

So I have two cards to share with you today, that I made with the Snow Globe dies along with a few extras. I'm having so much fun making Winter and Christmas cards!


The background paper is an older pack from Bazzill called Countdown To Christmas. I am not sure if it's still available. The Snowflake is from Taylored Expressions. I just cut out all of the pieces and put the houses together, then layered everything with foam tape. The houses come with several different dies, so you can have the windows a different color. I love that!


The paper that I cut most everything out of is an older 12 x 12 pad I had by DCWV called Old World Stack. I love the texture on it. 


This one I used mainly card stock for the different pieces, a little patterned paper for the one house and the background for the globe.  Also, instead of using the base of the snow globe, I cut a snowy hill using one of the Lawn Fawn Stitched Snowdrifts to go across the bottom.


The white trees are from Taylored Expressions, and the sentiment is from Papertrey Ink. I have linked to as many of the products I could at the bottom of my post.

Thank you so much for stopping by! I hope you are all enjoying the holiday season! I am! Love it!

Kay :)


Friday, March 6, 2015

Cozy Christmas

Hello Friends!

It's Friday! Yay! And even with all the snow on the driveway and the roads, the girl and I are going to McDonalds for breakfast! That may not sound that exciting to you, but we love to take the iPads with us and get coffee, hot chocolate and Egg McMuffins, and just relax and chit chat. 

So I managed to make a Christmas card this week! I'm going to do my best to post at least one Christmas card a week. That's the plan anyway.


For this card, I used a die from Cottage Cutz that I got for Christmas. Am I the only one who gets Christmas stuff for Christmas? :D Anyway, I cut a piece of watercolor paper out with one of my rectangle stitched dies, and sponged a small amount of Antique Linen distress ink in the center. Then I smooshed my ink pad down on an acrylic block mixed it with a little bit of water and flicked some little speckles on the piece.  The holly and bow, I cut out of white card stock and colored with my Copic markers. I had never tried this before, but I loved the way it turned out, so this is a technique that I will for sure being doing again. I layered the holly and bow with foam tape and glue dots, stamped the sentiment and added the little gold enamel dots last.


Supplies:
Holly Branch w/Bow - Cottage Cutz
Sentiment - Papertrey Ink
Stitched dies - Lawn Fawn

Well that's it for me today! We have a warm up on the way, so hopefully some of this snow will melt, and we'll be able to get outside and play more. Until then, I'll just make cards and clay things, because that's real fun :)

Have a great weekend!

Hugs,

Kay :)


Monday, January 26, 2015

Merry Monday Guest Designer


Hello friends!

Hope you all had a lovely weekend! I spent both Saturday and Sunday working on my clay things and doing some cards for my design teams. It was so enjoyable! I love it when it works out that I get both weekend days to craft! 


Today I am sharing a card with you for the Merry Monday Challenge where I am thrilled to be the guest designer this week! Thank you Katie so much for choosing my card as the winner last week! :) The theme this week is Carolers or a musical themed Christmas card. I searched high and low, but couldn't find a single caroler in my extensive collection of stamps, ( can't believe that!) so I turned this cute little Paper Smooches kitty into a caroler! He really looks the part doesn't he? So cute!


I've been playing with my watercolors a lot lately and I'm wanting to watercolor everything! haha! I had an idea in my mind when I did this background. I wanted it to look like a cold snowy night with some light, possibly emanating from a streetlight. I started in the center with some yellow and then worked my way out to the edges with blues, blue greens and purple. I stamped the sentiment with VersaMark ink and embossed it with white embossing powder. I cut a snowy hill and mounted that to my watercolor piece. I colored the kitty, his accessories and tree with Copic markers and added them with foam tape, then mounted the whole thing on an A2 card base.

Supplies:
Kitty-Paper Smooches
Hat-Paper Smooches
Sentiment- Paper Smooches
Tree-Paper Smooches
Scarf- Lawn Fawn
Snowy hill- Lawn Fawn

Stop by Merry Monday and see what all the fabulous designers have created with this theme and play along!

Thank you so much for stopping by! Hope you have a wonderful week!

Hugs,

Kay :)